So, you’ve noticed a bit of a damp patch under your terraced kitchen floor? It happens, especially in older homes. Water likes to find its way around, and before you know it, you’ve got a soggy situation. This isn’t just annoying; it can actually mess with the very bones of your floor. Let’s talk about how to spot the problem, fix it up, and stop it from happening again.
Key Takeaways
- Watch out for signs like damp spots, musty smells, or soft floorboards that tell you there’s water where it shouldn’t be.
- If you find a leak, try to pinpoint where the water is coming from. Sometimes it’s a simple pipe, other times it’s more complex.
- For immediate relief, temporary fixes can stop more water damage while you plan the real repairs for repairing rotten floor joists UK style.
- Assess how bad the damage is to your floor joists. You might need to patch them or, in worse cases, replace them entirely.
- Prevent future issues by making sure your sub-floor is waterproofed and that there’s good airflow underneath your kitchen.
Spotting Trouble Under Your Kitchen Floor
Okay, so you’ve got a kitchen in a terraced house, and maybe you’ve noticed something a bit… off. That feeling that something’s not quite right underfoot? It’s usually your first clue that there might be water lurking where it shouldn’t be. Ignoring these early signs is like leaving a leaky faucet running – it just gets worse and more expensive.
Signs Of A Damp Sub-Floor
So, what exactly should you be looking out for? It’s not always a gushing waterfall, you know. Sometimes it’s more subtle. Keep an eye out for these things:
- Musty smells: This is a big one. If your kitchen suddenly smells like a damp basement or old socks, that’s your nose telling you there’s moisture. It’s often the first thing people notice.
- Soft spots or spongy floors: Walk around your kitchen. Does any part of the floor feel a bit squishy or give way more than it should? That’s a sign the sub-floor or joists might be getting wet and weakening.
- Warped or discolored floorboards: Look closely at your kitchen floor. Are the boards starting to cup, buckle, or show dark stains? This usually means they’ve been exposed to moisture for a while.
- Peeling or bubbling paint/linoleum: If you have a painted sub-floor or vinyl flooring, you might see it starting to lift or bubble up. Water trapped underneath is the usual culprit.
- Visible mold or mildew: Sometimes, you might actually see fuzzy patches of mold or mildew growing on the floorboards or even the walls near the floor. Definitely not a good sign.
When To Call In The Pros
Look, I’m all for a bit of DIY, but some things are best left to the folks who do this for a living. If you’re seeing any of the following, it’s probably time to pick up the phone and call a professional:
- You can’t find the source of the leak: If you suspect water but have no idea where it’s coming from (is it the dishwasher? The pipes? Rain?), a pro can track it down.
- The damage looks extensive: If you’ve got a big area of rotten wood, or the floor feels really unstable, it’s beyond a quick fix.
- You’re not comfortable with the work: Honestly, if the thought of crawling around in a damp, dark space makes you break out in a sweat, just call someone. It’s not worth the stress or potential injury.
- Structural issues are suspected: If you think the joists themselves are seriously compromised, that’s a structural problem. Get an expert to assess it before the floor gives way.
Sometimes, the best ‘fix’ is knowing when to step back and let someone else handle it. It saves you time, money, and a whole lot of headaches down the line. Don’t be a hero if you don’t have to be!
Tackling Those Pesky Kitchen Leaks
Alright, so you’ve spotted some dampness, maybe even a puddle, under your kitchen floor. Not ideal, right? This is where we get down to business and figure out what’s going on and how to stop it. Finding the source of the water is step one, and it’s not always obvious.
Finding The Source Of The Water
This can be a bit of a detective job. Water doesn’t just appear out of nowhere, usually. Think about what’s above the affected area. Is it the sink? The dishwasher? Maybe a pipe running through the wall or floor? Sometimes, it’s not even inside the kitchen. Rainwater can find its way in through cracks in the foundation or walls, especially in older terraced houses where things can shift over time.
Here are a few common culprits:
- Plumbing: Check all the pipes under your sink, the dishwasher hoses, and the washing machine connections if they’re nearby. Look for drips, corrosion, or wet spots around fittings.
- Appliances: Dishwashers and refrigerators with ice makers can develop leaks. Sometimes the water line itself can be the issue.
- External Factors: If the leak is near an external wall, consider if there’s been heavy rain or if gutters are blocked, causing water to back up and seep in.
- Condensation: Believe it or not, sometimes condensation from pipes or even just the general humidity in a poorly ventilated space can cause dampness.
Don’t just assume it’s one thing. Trace the water back as far as you can. Sometimes a small drip from a pipe can travel quite a distance before you see the evidence.
Temporary Fixes To Buy You Time
Okay, so you’ve found the leak, or at least you think you have, but you can’t get a plumber out for a few days. What do you do? You need to stop the immediate damage. These are just temporary measures, mind you, not permanent solutions.
- Turn off the water supply: If the leak is from a specific fixture or appliance, see if you can shut off the water valve to that item. For a major leak, you might need to shut off the main water supply to the house. Just remember to turn it back on when you’re done for the day if you need water.
- Contain the water: Use buckets, old towels, or even plastic sheeting to catch drips and prevent water from spreading further under the floor. Mop up any standing water you can see.
- Dry the area: If possible, use fans or a dehumidifier to help dry out the sub-floor and surrounding joists. The drier things are, the less damage will occur.
- Patch it up (carefully): For a very minor pipe leak, you might be able to use waterproof tape designed for plumbing. This is really just to stop it from dripping until a professional can fix it properly. Don’t rely on this for long.
Remember, these are just to keep things from getting worse while you wait for the real repairs to happen. Don’t put off calling in the pros for too long, especially if the leak is significant.
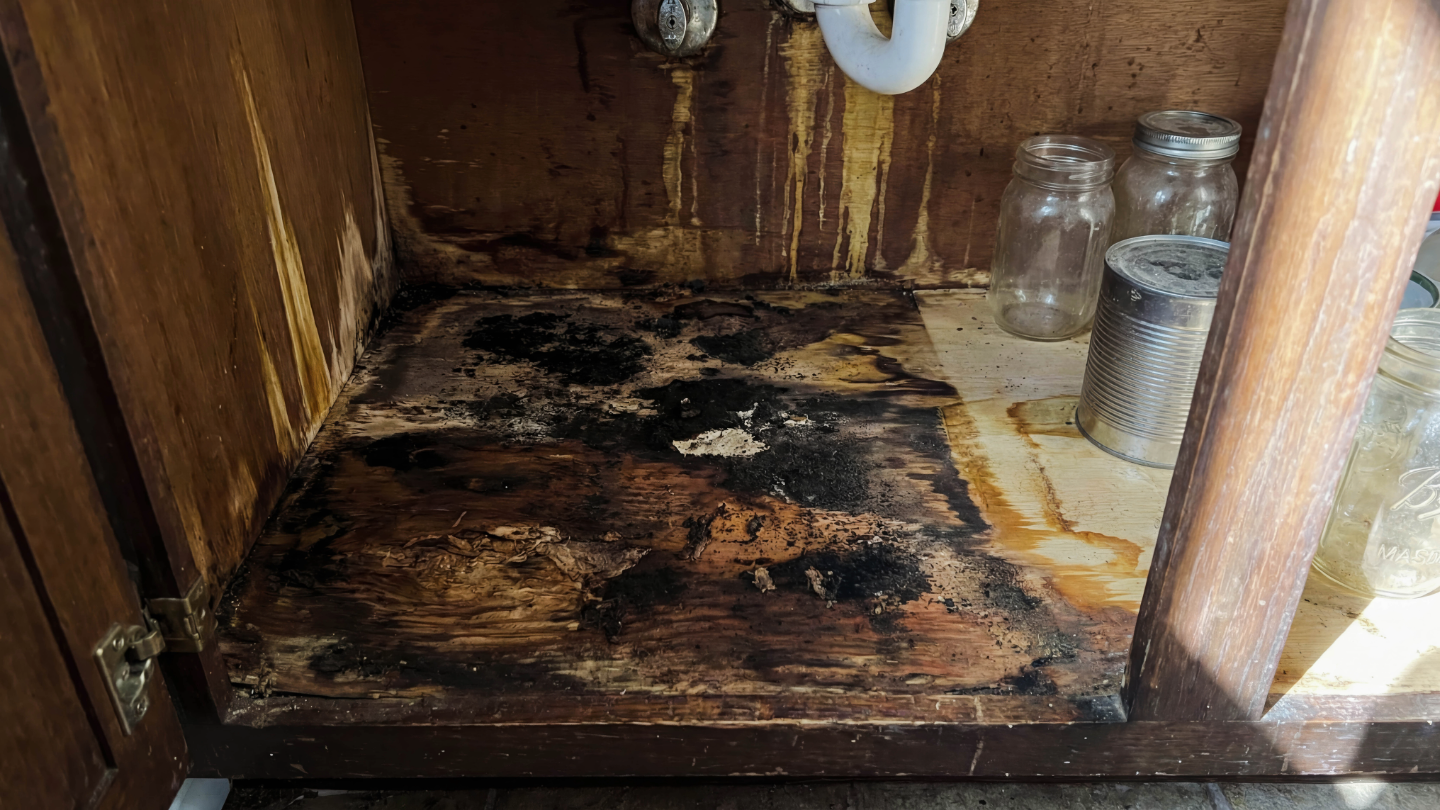
Dealing With Rotten Floor Joists
Okay, so you’ve found some dampness, maybe even a bit of rot, under your kitchen floor. The next thing you’re probably worried about are those wooden beams holding everything up – the floor joists. If they’re looking a bit sad, it’s time to get serious.
Assessing The Damage To Joists
First off, don’t panic. Not all dampness means the end of the world for your joists. You need to get a good look at them. Poke around with a screwdriver or a similar tool. If it goes in easily, that’s a bad sign. You’re looking for signs of fungal decay or insect damage. Soft spots, crumbling wood, or visible holes are all red flags. Try to figure out how widespread the problem is. Is it just one joist, or are several affected? A flashlight is your best friend here.
Repairing Rotten Floor Joists UK Style
If the rot is minor and localised, you might be able to patch it up. For smaller bits of decay, you can sometimes cut out the bad section and splice in a new piece of timber. Make sure the new wood is the same size and type as the original. You’ll want to secure it really well, often with metal plates and screws. For more serious issues, you might need to sister a new joist right next to the damaged one. This means bolting a new, solid joist alongside the old, rotten one. This adds extra support and takes the strain off the weak spot. It’s a bit like giving your floor a sturdy new crutch.
When Replacement Is The Only Option
Sometimes, the damage is just too much. If a joist is heavily rotted, especially if it’s sagging or looks like it’s about to give way, you can’t just patch it. Replacement is the only safe bet. This is where things get a bit more involved. You’ll likely need to support the floor above while you work. This might mean using temporary props. Then, you’ll carefully remove the old joist and install a brand-new one. This is often a job for someone with a bit more experience, or even a professional, especially if multiple joists are involved or if they’re load-bearing.
Remember, your floor joists are literally holding up your kitchen. If you’re not confident about assessing or repairing them, it’s always better to get a professional opinion. A small problem ignored can quickly become a very expensive and dangerous one.
Protecting Your Kitchen From Future Floods

Okay, so you’ve dealt with the immediate leak and maybe even some rotten joists. That’s a win! But we’re not done yet. We need to make sure this whole sub-floor situation doesn’t become a recurring nightmare. Think of it like putting a good raincoat on your house – you want it to be ready for whatever the weather (or a leaky pipe) throws at it.
Waterproofing Your Sub-Floor
This is where we get serious about keeping water out. You’ve got a couple of main ways to go about this, depending on what your sub-floor is made of and how much effort you want to put in. The goal is to create a barrier.
- Liquid Membranes: These are pretty common. You basically paint or roll on a thick, rubbery coating. It dries to form a seamless, waterproof layer. You’ll need a few coats, and it’s important to get it into all the nooks and crannies. Make sure the surface is clean and dry before you start, or it won’t stick properly.
- Sheet Membranes: These are like big, tough plastic sheets. You lay them down and seal the seams with special tape or adhesive. It’s a bit more work to get it perfectly flat and sealed, but some people find it more reliable.
- Cementitious Coatings: These are like a thick, waterproof plaster. They’re good for concrete sub-floors and can add a bit of strength too. You mix them up and apply them with a trowel or roller.
The key is to cover the entire surface, especially around any pipes or drains. Don’t skimp on this part; it’s your main defense.
Improving Ventilation Below
Sometimes, leaks aren’t just about water coming in, but about moisture getting trapped under your floor. This is especially true in older homes or kitchens that are prone to humidity. Good airflow is your friend here. It helps to dry things out and prevents that damp, musty smell from taking over.
- Check Existing Vents: Are there any vents leading from the outside into your sub-floor space? Make sure they aren’t blocked by debris, plants, or anything else. Give them a good clear-out.
- Add More Vents: If you don’t have enough, or they’re too small, consider adding more. This might involve cutting new holes in the foundation walls. It sounds like a big job, but it can make a huge difference to the air quality and dryness down there.
- Consider a Fan: For really stubborn dampness, you might even look into a small, low-power fan designed for crawl spaces. It can help keep the air moving constantly.
A damp sub-floor isn’t just a problem for your floorboards; it can lead to mold growth, which is bad for your health and can spread throughout your home. Good ventilation helps prevent this by allowing moisture to escape.
Think of these steps as giving your kitchen floor a solid shield. It’s a bit of preventative maintenance that can save you a whole lot of headaches (and money) down the line. Better safe than sorry, right?
Getting Your Kitchen Floor Back In Shape
Alright, so you’ve dealt with the leak, maybe even replaced some gnarly joists. Now comes the part where we make your kitchen floor look like a floor again, not some sad, soggy mess. It’s all about getting things solid and looking good.
Replacing Damaged Floorboards
If the water did a number on your floorboards, it’s time to swap ’em out. You don’t want to just slap new ones on top of old, damp ones, so make sure everything underneath is dry and sound. Measure twice, cut once, as they say. You’ll want to match the thickness and type of wood as best you can to the existing boards. If you’re going for a different look, that’s cool too, just make sure it sits level with the rest.
- Get the right tools: You’ll need a pry bar, a hammer, a saw (handheld or circular), and maybe a jigsaw for tricky cuts.
- Carefully remove old boards: Work from the edge, gently prying up the damaged boards. Try not to mess up the ones you’re keeping.
- Prep the space: Clean up any debris or old nails where the new boards will go.
- Fit the new boards: Cut them to size and nail them down securely. Make sure they’re flush with the surrounding boards.
Finishing Touches For A Solid Floor
Once the new boards are in, it’s time to make it all look like one cohesive floor. This is where you really bring it back to life. Sanding is your friend here. You’ll want to sand down any high spots or uneven edges where the new and old boards meet. This makes it smooth underfoot and ready for whatever finish you’re planning.
Don’t rush the finishing. Taking the time to sand properly and apply a good sealant or finish will make a huge difference in how your floor looks and how long it lasts. Plus, it adds that extra layer of protection.
After sanding, you’ve got options. You could go for a simple varnish, a stain to change the color, or even paint if that’s your vibe. Whatever you choose, apply it evenly and follow the product’s instructions. A well-finished floor not only looks great but also helps protect the wood from future spills and moisture. It’s the final step in making your kitchen feel whole again.
Is your kitchen floor looking a little sad? Don’t worry, we can help bring it back to life! Whether it’s scratched, dull, or just needs a refresh, we have the solutions to make it shine again. Ready to see your kitchen floor looking its best? Visit our website today to learn more about our floor restoration services!
So, What’s the Takeaway?
Alright, so dealing with a leaky sub-floor in your terraced kitchen isn’t exactly a walk in the park. It can be a real headache, especially when you’re not sure where to start. But hey, you’ve got the lowdown now on spotting the signs and what to do about it. Remember, don’t put off those repairs – a small drip now can turn into a big, soggy mess later. If you’re feeling overwhelmed, there’s no shame in calling in a pro. They’ve seen it all before and can get things sorted quickly. Good luck out there!
Frequently Asked Questions
My kitchen floor feels a bit squishy. What could be going on down there?
That squishy feeling might mean there’s water hanging out under your kitchen floor. It could be a leaky pipe, a problem with your dishwasher, or even something from outside if your house is older. It’s definitely something to check out sooner rather than later!
How do I know if I need to call a pro for my leaky kitchen floor?
If you see big water stains, smell moldy smells, or notice the floor is sagging, it’s time to call in the experts. Trying to fix serious water damage yourself can be tricky and might make things worse. They have the tools and know-how to figure out what’s really going on.
What’s the quickest way to stop a small leak from causing more damage?
For a super temporary fix, you could try to catch the water with buckets or towels. If it’s a pipe, sometimes wrapping it tightly with waterproof tape can slow down a drip. But remember, these are just to buy you time until you can get a proper repair done.
My floor joists (the wooden beams under the floor) look a bit mushy. Is that bad?
Oh yeah, mushy wood usually means rot, and that’s not good. Rot can weaken those beams, which support your whole floor. You’ll want to get someone to look at it right away to see how bad it is and if they need to be fixed or replaced.
Can I prevent my kitchen floor from getting wet again after I fix it?
You bet! Making sure your sub-floor is waterproofed is a big help. Also, improving air circulation underneath your kitchen can stop moisture from building up. Think of it like giving the space some breathing room.
My floorboards got damaged by water. What’s the deal with fixing them?
If the wood is just stained but not rotten, you might be able to clean it up and maybe even sand it down. But if the boards are warped or falling apart, you’ll probably need to swap them out for new ones. After that, you’ll want to make sure everything looks neat and tidy again.


