Is your wooden floor looking lacklustre? The secret to rejuvenating it lies in understanding the intricate floor sanding process. Floor sanding is not just about removing visible imperfections; it’s a confluence of science and artistry that transforms dull timber surfaces into flawless masterpieces. All homeowners need to appreciate the complexities and significance of the process to recognise its transformative potential fully. By delving into the detailed steps involved, readers can gain valuable insights and ensure their floors are restored to their former glory, ready to endure years of use while enhancing home aesthetics and value.
Understanding the Floor Sanding Process
Floor sanding is an intricate procedure that marries scientific precision with artistic skill, aimed at rejuvenating wooden floors by eliminating old finishes and imperfections. This dual nature of the process ensures that the floors not only regain their original elegance but also maintain their structural integrity. The technical aspect involves selecting the right sanding techniques and equipment to strip away the old layers without damaging the wood beneath. Meanwhile, the artistic side demands a keen eye for detail to ensure an even, smooth finish that highlights the natural beauty of the wood. Understanding these complexities helps homeowners appreciate the transformative power of a well-executed floor sanding process.
The significance of floor sanding extends beyond mere aesthetics. This process is crucial in maintaining the longevity and value of wooden floors. By expertly removing surface blemishes and applying appropriate finishes, sanding protects the wood from future wear and tear. Furthermore, it prepares the floor surface for subsequent treatments or coatings, ensuring they are absorbed uniformly and effectively. As such, floor sanding is a vital maintenance practice that contributes to the health and appearance of wooden floors, making it a worthwhile investment for any property owner.
- Restores the original beauty and sheen of wooden floors.
- Increases the floor’s lifespan by removing damaged layers.
- Prepares the surface for effective application of protective finishes.
- Enhances the value of the property by maintaining floor quality.
- Reduces maintenance needs by preventing future damage.
Essential Preparation for Floor Sanding
Proper preparation is the cornerstone of a successful floor sanding process, ensuring that no dirt or imperfections are embedded into the wood during sanding. It begins with clearing the room of all furniture and obstructions. This step is vital as it provides an unobstructed workspace and prevents damage to belongings from dust and equipment. Once the area is cleared, a thorough cleaning of the floor is essential. Dust, dirt, and debris must be meticulously removed to prevent them from being sanded into the wood surface, which could result in an uneven finish and potential damage.
The next crucial step involves inspecting the floor for damages such as cracks, loose planks, or gaps that may require wooden floor repairs. Any identified issues should be promptly addressed by filling cracks and gaps with appropriate wood filler and securing loose planks with screws. This not only ensures a smooth surface for sanding but also fortifies the floor’s structure, preventing further damage during the sanding process. Proper repairs contribute to a uniform finish and enhance the overall durability of the floor.
Gathering the necessary materials and equipment is another key preparation task. Safety gear, such as dust masks and ear protection, is indispensable to protect against dust inhalation and noise during sanding. Understanding the type of wood is crucial to selecting suitable sanding equipment and techniques. Some wood types may require specific sanders or grits to achieve the best results without causing damage. By following these essential preparation steps, homeowners can ensure a seamless and efficient sanding process that restores the beauty and integrity of their wood floors.
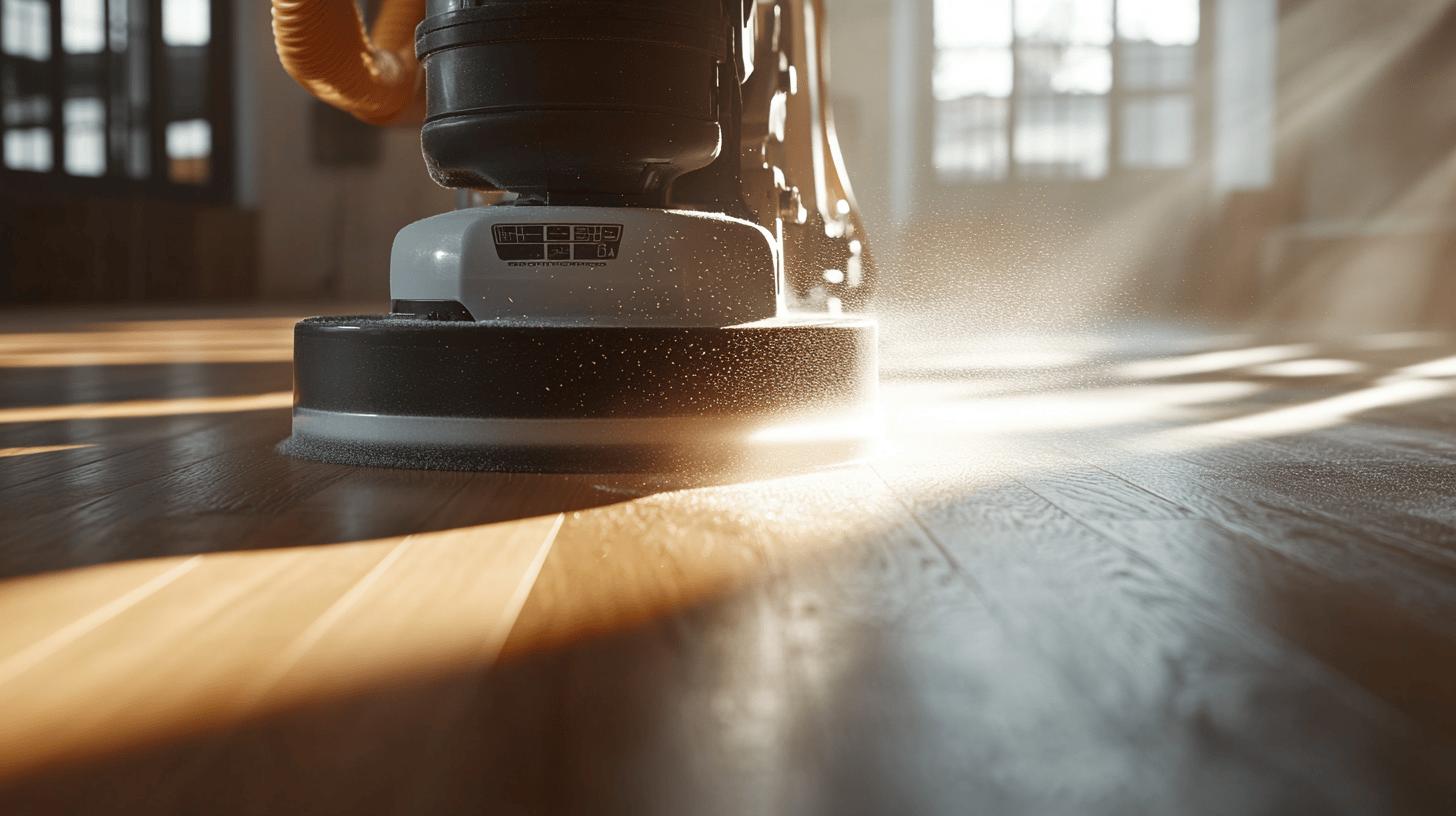
Choosing the Right Sanding Equipment

Selecting the appropriate sanding equipment is pivotal to achieving a flawless floor finish. The right choice enhances efficiency and the quality of the sanded surface. Each type of sander serves a specific purpose, and understanding these differences ensures the best results for your flooring project.
Drum Sanders
Drum sanders are the workhorses of the sanding world, known for their power and efficiency in covering large areas. Due to their robust motors and aggressive sanding capabilities, they are ideal for stripping old finishes and levelling uneven surfaces. However, they require skill to operate, as improper use can result in gouges or uneven sanding patterns.
Orbital Sanders
Orbital sanders are versatile tools that excel in achieving a smooth, refined finish. Their circular motion minimizes the risk of leaving sanding marks, making them perfect for finer work after the initial heavy sanding. They are easier to control than drum sanders, making them suitable for less experienced users or delicate flooring types.
Edge and Handheld Sanders
Edge sanders and handheld sanders are essential for detailed work in areas that larger machines cannot reach, such as corners and around edges. These sanders allow for precision and control, ensuring that every part of the floor is uniformly sanded. Their compact size makes them invaluable for intricate tasks that demand attention to detail.
- Drum sanders: Best for large areas and removing old finishes.
- Orbital sanders: Ideal for smooth finishes and delicate wood types.
- Edge sanders: Perfect for reaching corners and edges.
- Handheld sanders: Suitable for detailed and intricate work.
Step-by-Step Sanding Techniques
The sanding process begins with selecting the appropriate grit of sandpaper, a critical first step in the sanding sequence. Start with coarse-grit sandpaper, typically around 36-40 grit, to effectively strip away old finishes and level the floor’s surface. This initial step is crucial as it removes surface imperfections, stains, and accumulated grime, setting the foundation for a smooth finish. It’s essential to maintain consistent pressure and movement across the floor to avoid uneven sanding patterns that can cause irreversible damage to the wood.
Once the old finish is thoroughly removed, the next step involves using a medium-grit sandpaper, usually between 60-80 grit. This stage aims to refine the floor surface, smoothing out the scratches left by the coarse grit. By transitioning to a medium grit, you enhance the floor’s texture, preparing it for a more polished finish. At this stage, attention to detail is vital, especially in areas where the grain may change direction, necessitating careful handling to maintain uniformity.
Following the medium grit, the process moves to fine-grit sandpaper, typically 100-120 grit, to achieve a polished and smooth finish. This step eliminates the remaining minor scratches and ensures a flawless surface ready for finishing. The fine grit not only enhances the wood’s appearance but also ensures a uniform texture that optimizes the absorption of subsequent protective coatings. Handheld sanders are particularly useful at this stage to address edges and corners, ensuring every part of the floor is evenly sanded.
- Begin with coarse-grit sandpaper (36-40 grit) to remove old finishes.
- Progress to medium-grit sandpaper (60-80 grit) for smoothing surfaces.
- Use fine-grit sandpaper (100-120 grit) for a polished finish.
- Ensure consistent pressure and movement for uniform sanding.
- Pay special attention to edges and corners with handheld sanders.
- Adapt sanding techniques based on wood type to maintain uniformity.
Different wood types may require slight adjustments in technique to avoid over-sanding and to protect the wood’s natural characteristics. For example, softer woods may need less aggressive sanding, while harder woods can withstand more intensive sanding techniques. By understanding the specific needs of each wood type, one can achieve the best possible results, ensuring both the beauty and longevity of the floor.
Finishing Touches and Floor Coating
Once the sanding process is complete, applying a protective finish is crucial to enhance the floor’s durability and aesthetic appeal. Polyurethane is a popular choice for floor coating and is available in oil- and water-based formulations. Oil-based polyurethane provides a rich, warm appearance, deepening the wood’s natural tones, while water-based polyurethane offers a clear finish, preserving the wood’s original colour. It is advisable to apply at least two coats of the chosen finish to ensure adequate protection against daily wear and tear. Each coat should be allowed to dry completely before applying the next, following the manufacturer’s instructions for drying times and application methods. Proper application techniques, such as using a high-quality brush or roller, can significantly impact the smoothness and uniformity of the finish.
In addition to polyurethane, there are several other finishing options to consider, each offering unique benefits. Buffing the floor after the final coat of finish can add a polished sheen, enhancing the overall look. This step not only elevates the floor’s appearance but also extends its longevity by creating an additional barrier against moisture and scratches. When applying finishes, ensure the room is well-ventilated to facilitate proper drying and reduce the inhalation of fumes. Protective gear, such as masks and gloves, should be worn to safeguard against potential health risks.
- Oil-based polyurethane: Offers a warm, rich finish; ideal for deepening wood tones.
- Water-based polyurethane: Provides a clear finish and maintains the wood’s original colour.
- Wax finishes: Add a natural, matte look; suitable for low-traffic areas.
- Hardwax oils: Combine oil and wax for a durable, breathable finish.
- Shellac: Quick-drying option that enhances the wood’s natural grain.
Safety Tips and Common Mistakes to Avoid

Safety is a critical concern when engaging in the floor sanding process. Protecting oneself from dust inhalation and equipment-related hazards is essential. Wearing protective gear, such as dust masks, safety goggles, and ear protection, is non-negotiable. Dust masks prevent inhalation of fine particles, which can be harmful to respiratory health. Safety goggles shield eyes from debris, while ear protection mitigates noise exposure from sanding machines. Ensuring the workspace is well-ventilated further reduces the risk of inhaling harmful dust and fumes. By adhering to these safety measures, individuals can safeguard their health and ensure a safer working environment.
Common mistakes during floor sanding can compromise the quality of the finished product. One frequent error is uneven sanding, often caused by inconsistent pressure or incorrect use of sanding machines. This can result in visible grooves and an uneven surface. Neglecting corners and edges is another pitfall, as these areas require meticulous attention to achieve a uniform finish. To avoid these issues, it’s essential to follow proper sanding techniques, maintaining consistent pressure and overlapping passes. Using appropriate equipment, such as edge sanders, ensures that corners and edges receive the same level of attention as the main floor area, leading to a flawless result.
- Always wear protective gear: dust masks, goggles, and ear protection.
- Ensure the workspace is well-ventilated.
- Maintain consistent pressure to avoid uneven sanding.
- Use edge sanders for corners and edges.
- Overlap sanding passes for uniformity.
Professional vs. DIY Floor Sanding
When considering floor sanding, the choice between DIY and professional services is pivotal. DIY floor sanding is appealing due to its potential cost savings. However, it comes with risks, such as uneven results and the possibility of equipment mishandling. Without the proper expertise, the floor is likely to be damaged, leading to costly repairs. The time investment is significant, as DIY projects often extend beyond initial expectations due to the learning curve associated with equipment usage and technique mastery.
Professional floor sanding services, such as those offered by Ryan’s Restoration, provide a level of expertise and precision that is difficult to replicate with DIY efforts. Professionals are equipped with advanced tools and possess the experience necessary to deliver high-quality results. They ensure that the sanding process is completed efficiently and effectively, minimizing disruptions and guaranteeing a flawless finish. This expertise not only enhances the appearance of the floors but also increases their longevity, making professional sanding a valuable investment for maintaining property value.
Choosing between DIY and professional floor sanding should involve careful consideration of factors such as time, skill level, and desired outcome. While the initial cost of professional services may be higher, the benefits of expert craftsmanship, time savings, and superior results often outweigh the expense. Hiring a qualified service like Ryan’s Restoration ensures peace of mind, as homeowners can trust in their reliability and commitment to exceptional quality.
Final Words
Delving into the intricate floor sanding process reveals its complexity as both a scientific and artistic endeavour. The essential preparation, including cleaning and repairing, ensures success while choosing the right sanding equipment maximises efficiency. Following the proper techniques guarantees a smooth finish that is ready for the final floor coating.
Safety tips and avoiding common mistakes further contribute to achieving flawless results. Whether opting for DIY or professional services like Ryan’s Restoration, understanding the floor sanding process empowers homeowners to make informed decisions. With careful attention, restoring a wooden floor’s beauty becomes achievable and rewarding.
FAQ
What are the stages of sanding floors?
The stages of sanding floors typically involve starting with coarse-grit sandpaper to remove old finishes, followed by medium-grit for smoothing the surface. The final stage uses fine-grit sandpaper for a polished finish.
How does floor sanding work?
Floor sanding involves using sanding papers of varying densities to remove the top surface layer of wood. This process eliminates imperfections and prepares the surface for a new finish, restoring the floor’s beauty.
How to sand floors for beginners?
Beginners should start by choosing the right grit sequence, typically beginning with coarse-grit and progressing to fine-grit sandpaper. It’s important to maintain even pressure and follow the wood grain for the best results.
How many passes are needed when sanding floors?
Typically, three passes are required to achieve a smooth finish: initial coarse grit to remove old finishes, medium grit to smooth the surface, and fine grit for a polished look.
What is the cost of sanding wooden floors?
The cost of sanding wooden floors can vary based on the size of the area and the condition of the floors. On average, professional services in the UK may charge between £12-£20 per square metre.
Can floors be sanded by hand?
Yes, floors can be sanded by hand, but it is labour-intensive and time-consuming. Hand sanding is best for small areas or detailed work that larger machines might miss.
What is the floor sanding grit sequence?
The grit sequence for sanding starts with a coarse grit (such as 40), followed by medium grit (60-80), and finishes with a fine grit (100-120) for a smooth result.
What equipment is required for floor sanding?
Essential sanding equipment includes drum sanders for large areas, orbital sanders for smoother finishes, and edge sanders for corners and edges. Each type ensures efficiency and quality in different floor areas.


