So, you’ve got these cool old floors in your 1930s house, the kind with the neat little wood patterns? That’s parquet! It’s pretty common in these older homes, but after decades, it can look a bit sad. Maybe it’s scratched up, dull, or even has some missing bits. This article is all about figuring out if your 1930s parquet restoration is possible, what’s involved, and what it might cost. We’ll cover everything from fixing those worn spots to making it look brand new again.
Key Takeaways
- Older parquet from the 1930s has a unique charm but often shows wear like scratches, fading, and loose blocks.
- Restoring 1930s parquet typically involves sanding, repairing damaged sections, and removing old glue.
- Choosing the right finish, whether varnish or oil, is important for both looks and protection.
- Deciding between a DIY job and hiring a professional for 1930s parquet restoration depends on the floor’s condition and your skill level.
- The cost of 1930s parquet restoration varies, but a well-restored floor can add significant value to your home.
Understanding Your 1930s Parquet Flooring
What Makes 1930s Parquet Special
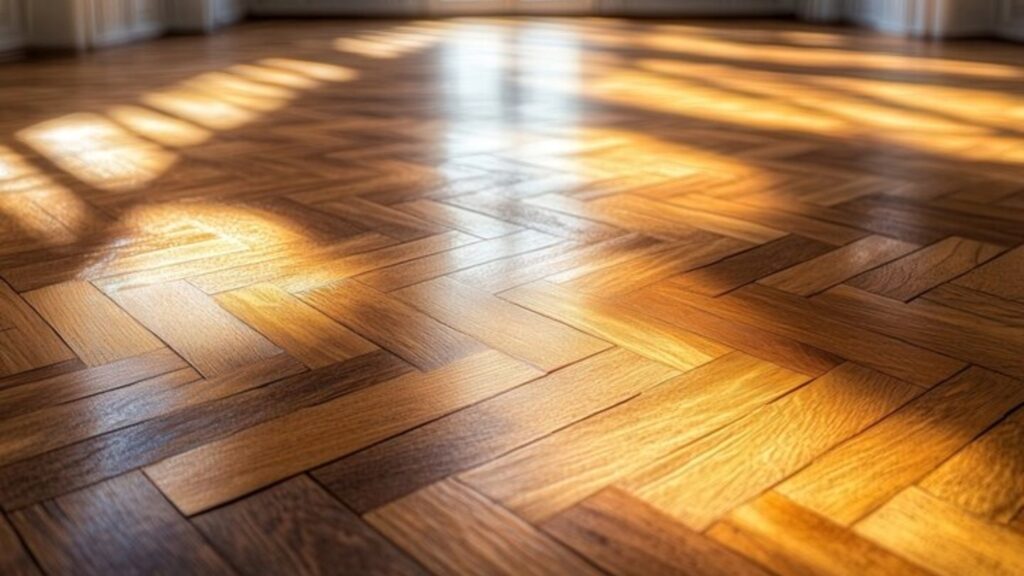
So, you’ve got this cool old parquet floor in your 1930s place. What’s the deal with it? Well, back in the day, parquet wasn’t just some fancy flooring; it was a real statement. Think geometric patterns, often in oak or sometimes walnut, laid out in these intricate designs like herringbone or the classic basket weave. It’s a sign of quality craftsmanship that you just don’t see every day anymore. These floors were built to last, and they often have a warmth and character that newer floors struggle to match. It’s not just wood; it’s a piece of history under your feet.
Common Issues Found in Older Parquet
After decades of life, your parquet floor might be showing its age. It’s pretty common to find a few issues. You might see blocks that have come loose, especially around the edges or in high-traffic spots. Sometimes, the wood itself can get worn down, looking dull or even showing deep scratches. Water damage is another big one; a leaky pipe or a forgotten spill can cause blocks to swell or warp. And let’s not forget about old finishes. Over the years, layers of wax, varnish, or paint can build up, making the floor look dark and obscuring the natural beauty of the wood.
Here are some common problems you might spot:
- Loose or missing blocks
- Deep scratches and dents
- Warped or cupped wood pieces
- Faded or damaged finish
- Stains from spills or pet accidents
- Gaps between blocks due to shrinkage
Is Your Parquet Worth Restoring?
This is the big question, right? Most of the time, the answer is a resounding yes! Even if your floor looks pretty rough, there’s a good chance it can be brought back to life. The key is to look at the condition of the individual wood blocks. Are they mostly intact, even if scratched or worn? If the wood itself is solid, restoration is usually a good bet. Floors that have been painted over can often be stripped back to reveal beautiful wood underneath. However, if large sections are rotten, severely water-damaged, or riddled with woodworm, it might be a tougher (and more expensive) job. Generally, if the subfloor is sound and the majority of the wood blocks are salvageable, go for it.
Restoring your original parquet floor isn’t just about fixing it up; it’s about bringing back the soul of your home. These floors have stories to tell, and a good restoration lets them speak again.
The Nitty-Gritty of Parquet Restoration
Alright, so you’ve decided your old parquet floor has seen better days and you’re ready to bring it back to life. This is where the real work begins, and honestly, it’s not always pretty. We’re talking about getting down and dirty to reveal the wood’s true character.
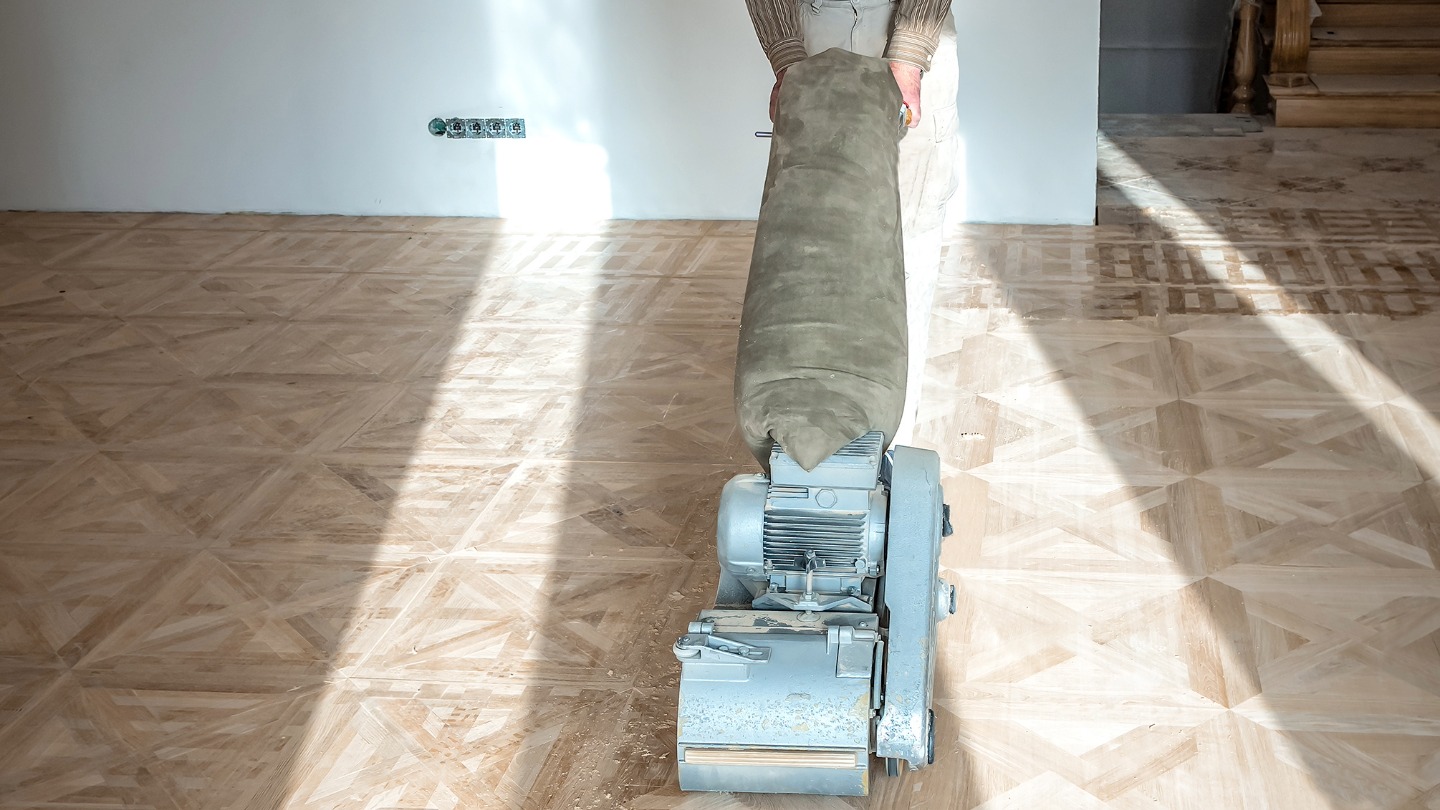
Sanding Down to Bare Wood
This is probably the most important step. You’ve got to get rid of all that old gunk – the varnish, the wax, maybe even some questionable paint jobs from decades past. A good sanding will not only clean the surface but also level out any minor dips or bumps. You’ll likely need a drum sander for the main areas and an edge sander for the bits near the walls. It’s a dusty job, so make sure you’ve got good masks and ventilation. You might need to go over it a few times with different grits of sandpaper, starting coarse and getting finer, to get that smooth, bare wood finish.
Repairing Damaged Blocks
As you sand, you’ll start to see what’s really going on. Some blocks might be loose, others might be chipped or even missing. This is where you play detective and repairperson. Loose blocks usually need to be carefully pried up, the old adhesive scraped off, and then re-glued and weighted down. For chipped or broken blocks, you have a few options. Sometimes you can carefully sand down the damage if it’s minor. If it’s worse, you might need to replace the block entirely. Finding matching wood can be tricky, but it’s worth the effort for a consistent look.
Dealing with Old Adhesives
Back in the day, floors were often stuck down with bitumen or tar-based adhesives. These can be a real pain to remove. They’re sticky, messy, and sometimes smell a bit funky. You’ll need to scrape as much as you can, but often, a good sanding will take care of the rest. Be aware that some of these old adhesives can contain asbestos, so if you suspect this, it’s best to get it tested before you start scraping away like crazy.
The goal here is to get the floor as flat and clean as possible. Any imperfections you leave now will show up even more once you apply the finish. Patience is key, and don’t rush this stage. It sets the foundation for everything that follows.
Here’s a quick look at what you might encounter:
- Loose Blocks: Need re-gluing and clamping.
- Scratches & Gouges: Minor ones can be sanded out; deeper ones might need filling or block replacement.
- Water Stains: Can be tough. Sometimes sanding removes them, other times they might need bleaching (carefully!).
- Warped Blocks: These are the trickiest. Sometimes they can be coaxed back into place, but often they need replacing.
It’s a lot of hands-on work, but seeing those old blocks come back to life is pretty satisfying.
Finishing Touches for a Stunning Look
Alright, so you’ve wrestled your parquet floor back into shape. It’s sanded, any broken bits are fixed, and you’re staring at that beautiful, bare wood. Now comes the fun part: making it look amazing! This is where you get to decide the final vibe of your room. It’s not just about protection; it’s about personality.
Choosing the Right Varnish or Oil
This is a big decision, and honestly, it comes down to what you want your floor to feel like and how much upkeep you’re willing to do. Varnish (or polyurethane, as it’s often called) is like a tough shield. It sits on top of the wood, offering great protection against spills and wear. It can give you a really glossy finish if you want that, or you can go for a more matte look. It’s pretty low maintenance once it’s on.
Oil, on the other hand, soaks into the wood. It gives a more natural, matte look that many people love. It feels warmer underfoot, too. The catch? It needs more regular care. You’ll likely need to re-oil it every year or two, depending on how much traffic the floor gets. Think of it like moisturising your skin – it keeps the wood looking healthy and rich.
Achieving That Perfect Sheen
Once you’ve picked your finish, you need to think about the shine level. This is often called the ‘sheen’ or ‘finish’. You’ve got a few main options:
- Matte: This is super subtle. It looks very natural, almost like the wood is unfinished. It hides minor scratches and scuffs really well, which is a bonus.
- Satin: This is probably the most popular choice. It has a gentle sheen, not too shiny, not too dull. It reflects light nicely without being blinding.
- Semi-Gloss: You’ll see a bit more shine here. It’s a bit more reflective and can make a room feel brighter.
- High-Gloss: This is the mirror finish. It’s very dramatic and can make a small room feel bigger, but it shows every speck of dust and every tiny scratch. It’s also the most slippery.
Most people find satin or matte to be the sweet spot for 1930s homes. It keeps that classic, understated elegance.
Color Matching and Staining Options
Sometimes, the old wood has faded unevenly, or maybe you’ve had to replace a few blocks and they don’t quite match. Staining can help even things out or completely change the look. You can go for a natural look that just brings out the wood’s own color, or you can get creative.
- Natural Tones: Think light oak, warm walnut, or a deep cherry. These usually work well with the original character of the house.
- Grey Washes: These can give a more modern, slightly weathered look.
- Dark Stains: Espresso or ebony can create a really dramatic, sophisticated feel.
It’s a good idea to test any stain on a hidden area or a scrap piece of wood first. What looks good on the can might be totally different on your actual floor. Getting the color just right is key to making your restored parquet look intentional and beautiful.
Remember, the goal here is to complement the style of your 1930s home. While you can go wild with color, sticking to wood tones or subtle shades often feels more authentic and timeless. It’s about bringing out the best in the original material, not covering it up.
When to Call in the Pros for 1930s Parquet
Okay, so you’ve looked at your parquet floor, maybe even tried a little patch-up job yourself. It’s a bit like deciding whether to tackle that leaky faucet or just call a plumber, right? Sometimes, you can handle it, but other times, you really need someone who knows their stuff. For 1930s parquet, especially, there are definitely times when calling in the experts is the smartest move.
DIY vs. Professional Restoration
Look, I’m all for a good DIY project. It feels great to fix something yourself. But parquet restoration? It’s a different beast. If your floor just needs a quick buff and a new coat of wax, maybe you can give it a go. But if you’re seeing deep scratches, loose blocks, or that old, stubborn adhesive that just won’t budge, it’s probably time to step back.
Here’s a quick rundown:
- DIY is probably fine if:
- The floor is generally in good shape.
- You only need to clean and reapply a finish.
- You have plenty of time and patience.
- Go pro if:
- There’s significant damage (gouges, missing blocks).
- You suspect lead paint or asbestos in old finishes (yikes!).
- The subfloor might be compromised.
- You want a truly flawless, professional result.
Seriously, messing up a parquet floor can be way more expensive to fix than hiring someone in the first place.
Finding a Specialist in Parquet
Not all flooring guys are created equal, especially when it comes to old parquet. You don’t want someone who usually installs carpet trying to work on your delicate herringbone. Look for people who specifically mention wood floor restoration, and even better, those who have experience with older wood floors or parquet specifically. Check out:
- Local woodworking guilds or associations.
- Online reviews (look for comments about parquet).
- Recommendations from architectural salvage yards or historical societies.
Ask them about their experience with 1930s materials and techniques. It makes a difference.
What to Expect from a Professional Quote
When you get a quote, it shouldn’t just be a number. A good professional will walk through your house, look at the floor, and talk to you about what needs to be done. They should break down the costs for you. Expect to see things like:
- Assessment Fee: Sometimes, just to come out and look.
- Sanding: Usually priced per square foot. They might mention different grits of sandpaper.
- Repairs: This can be tricky to quote upfront. They might charge hourly or give an estimate for block replacement.
- Finishing: Cost of the varnish, oil, or sealant, plus labor.
- Cleanup: Disposal of dust and old materials.
Don’t be afraid to ask questions. A good pro will be happy to explain their process and why they recommend certain steps. It shows they know their stuff and want you to be happy with the end result.
They should also give you an estimated timeline. Restoration isn’t usually a one-day job, especially for a whole house. Be realistic about the time it takes to do it right.
The Financial Side of Parquet Revival
Okay, let’s talk about the elephant in the room: money. Restoring that gorgeous 1930s parquet floor isn’t exactly pocket change, but it’s definitely an investment that can pay off. You’re not just fixing a floor; you’re bringing back a piece of history and adding some serious charm (and value!) to your home.
Cost Breakdown of Restoration Steps
So, what exactly are you paying for? It breaks down into a few main areas. Think of it like this:
- Preparation: This is where the real work starts. It includes clearing the room, maybe removing old carpet or vinyl, and then the initial cleaning. If there are stubborn old adhesives or coatings, that’s extra time and elbow grease.
- Sanding: This is a big one. Getting down to the bare wood takes specialised equipment and skill. The number of passes needed and the condition of the wood really affect the cost here.
- Repairs: If you’ve got loose blocks, missing pieces, or deep gouges, these need fixing. Sourcing matching wood can sometimes be tricky and add to the bill.
- Finishing: This is the fun part – applying the varnish, oil, or wax. The type of finish you choose and how many coats are applied will change the price.
- Labor: Don’t forget the folks doing the work! Their time, skill, and experience are a significant part of the overall cost.
Factors Influencing the Price
Why does one quote look so different from another? A few things play a role:
- Size of the area: Obviously, a bigger floor costs more to fix.
- Condition of the floor: This is probably the biggest factor. A floor that just needs a light sand and a new coat of varnish will be way cheaper than one with water damage, missing blocks, and layers of old paint.
- Type of wood: Some woods are harder to work with or more expensive to replace if needed.
- Location: Prices can vary depending on where you live. Big cities often have higher labor rates.
- DIY vs. Professional: Doing it yourself can save money on labor, but you’ll need to rent tools and buy materials. Plus, there’s the risk of making mistakes that could cost more to fix later.
Here’s a rough idea, but remember, these are just ballpark figures:
| Service | Estimated Cost (per sq ft) | Notes |
|---|---|---|
| Basic Sanding & Seal | $3 – $7 | Light wear, good condition |
| Full Restoration | $7 – $15+ | Deep sanding, repairs, multiple finishes |
| Block Replacement | $10 – $25+ per block | Depends on wood type and availability |
Long-Term Value of Restored Parquet
While the upfront cost might seem steep, think about the payoff. A beautifully restored parquet floor is a major selling point. It adds character and a touch of luxury that new flooring just can’t replicate. Buyers often see it as a sign of a well-maintained home. Plus, when done right, parquet is incredibly durable. You’re looking at decades more life out of it, which, when you break it down over time, makes it a pretty smart financial move.
It’s easy to get sticker shock when you see the numbers for professional restoration. But remember, you’re not just paying for someone to sand and varnish. You’re paying for their knowledge of old wood, their specialised tools, and the skill to bring something beautiful back from the brink. It’s an investment in your home’s charm and its future value.
Maintaining Your Beautifully Restored Parquet
So, you’ve gone through the whole song and dance of getting your 1930s parquet floor looking amazing again. Awesome! Now, the big question is, how do you keep it that way without turning into a full-time floor butler? It’s not as hard as you might think, honestly. A little bit of regular care goes a really long way.
Daily Cleaning Tips
For everyday upkeep, forget the harsh stuff. You want to keep things gentle. Think sweeping or a quick vacuum with a soft brush attachment. The goal here is to pick up dust and little bits of grit that can scratch the finish over time. Regular, light cleaning is your best friend.
- Sweep: Use a soft-bristle broom daily or every other day, especially in high-traffic areas.
- Vacuum: If you prefer vacuuming, make sure the beater bar is turned off or use a specific hard floor attachment. You don’t want it digging into the wood.
- Spot Clean: For small spills, grab a slightly damp cloth. Don’t let liquids sit on the floor, though. Just wipe it up and dry the spot.
Protecting Your Floor from Damage
This is where you can really prevent future headaches. Think of it like putting little shields on your floor. Things like furniture legs and pet claws can be real troublemakers.
- Furniture Pads: Stick felt pads on the bottom of all your furniture legs. Seriously, do this for chairs, tables, sofas – everything. It makes a huge difference when you move things around.
- Rugs and Mats: Place doormats at all entrances to catch dirt and moisture before it gets tracked onto your parquet. Inside, consider area rugs in spots that get a lot of wear, like in front of the sink or the sofa.
- Pet Care: Keep your pets’ nails trimmed. It might sound minor, but sharp claws can scratch even a well-finished floor.
- Avoid High Heels: If you can, try to avoid wearing stiletto heels or shoes with hard, sharp heels indoors. They can leave dents.
When it comes to cleaning, always err on the side of caution. A slightly damp cloth is usually better than a soaking wet one. Water is the enemy of wood floors if it’s left to sit.
Re-oiling or Re-varnishing Over Time
Even with the best care, your floor’s finish won’t last forever. Depending on the type of finish you chose and how much traffic your floor sees, you’ll eventually need to refresh it. This isn’t a full restoration; it’s more like a touch-up.
- Oiled Floors: These usually need re-oiling every 1-3 years. You’ll notice the floor looking a bit dull or water spots not wiping away as easily. It’s a pretty straightforward process – clean the floor thoroughly, then apply a thin coat of the same oil used during restoration.
- Varnished/Lacquer Floors: These tend to last longer, maybe 5-10 years, before they start to show wear. You’ll see scratches and dull patches. Refreshing these might involve a light screen and recoat, which is less intensive than a full sanding.
Knowing when to do this maintenance is key to extending the life of your beautiful parquet. It’s much easier and cheaper to do a recoat than to go back to square one with sanding.
Keeping your beautiful parquet floors looking great is simple! Regular cleaning and the right care will make them shine for years. Want to learn more about how to keep your floors looking their best? Visit our website for expert tips and advice.
So, What’s the Takeaway?
Look, bringing those old parquet floors back to life in a 1930s house isn’t exactly a walk in the park. It can get pricey, and you’ll probably run into some unexpected issues along the way. But honestly, seeing those beautiful, original floors shine again? It’s pretty darn satisfying. It adds so much character to a home that newer stuff just can’t match. If you’re thinking about it, do your homework, get a few quotes, and be ready for a bit of a project. It’s a big job, for sure, but for many, the charm and history it brings back are totally worth the hassle and the cash.
Frequently Asked Questions
What’s so cool about old parquet floors from the 1930s?
Back in the day, parquet was all about fancy patterns made from small wood pieces. It’s like a wooden puzzle that looks super neat and adds a lot of character to your home. These old floors have a story to tell and are way more interesting than plain old planks!
My parquet floor looks pretty beat up. Can it really be fixed?
Most of the time, yes! Even if it’s got scratches, dents, or some loose bits, a lot of that can be fixed. We’re talking about sanding away the old stuff to get to fresh wood, filling in gaps, and maybe even replacing a few bad pieces. It’s like giving your floor a makeover!
How much does it cost to fix up my old parquet floor?
It really depends on how much work it needs. Simple sanding and sealing might be a few hundred bucks, but if you need lots of repairs or fancy finishes, it could go up to a few thousand. Think of it as an investment in making your home look awesome.
Should I try to fix my parquet floor myself, or hire someone?
Honestly, fixing parquet can be tricky. Sanding it evenly without messing up the pattern is tough, and dealing with old glue is a pain. For the best results, especially if your floor needs serious help, hiring a pro who knows parquet is usually the way to go. They have the right tools and know-how.
What’s the difference between using varnish and oil on my floor?
Varnish puts a tough, protective layer on top, kind of like plastic. It’s super durable. Oil soaks into the wood, making it look more natural and matte. It’s easier to fix if it gets scratched later, but you might need to reapply it more often than varnish.
How do I keep my restored parquet floor looking good?
Easy peasy! Just sweep or vacuum regularly to get rid of dirt and grit that can scratch the wood. Use damp (not soaking wet!) mops for cleaning, and put felt pads on furniture legs. Avoiding high heels and spills is also a good idea. A little care goes a long way!


