
Transform your home’s vibe with perfect wood floor staining reminiscent of a masterpiece. But here’s a thought: without the right preparation, your floor’s charm could fade like a forgotten painting. This guide arms homeowners with the know-how to master the staining process, ensuring stunning results that stand the test of time. From meticulous sanding to selecting the ideal stain, every step is crafted for success. Take the journey with this detailed, step-by-step guide and unlock the transformative power of a beautifully stained wood floor. Your home’s aesthetic and value await its renaissance.
Preparing Your Wood Floor for Staining
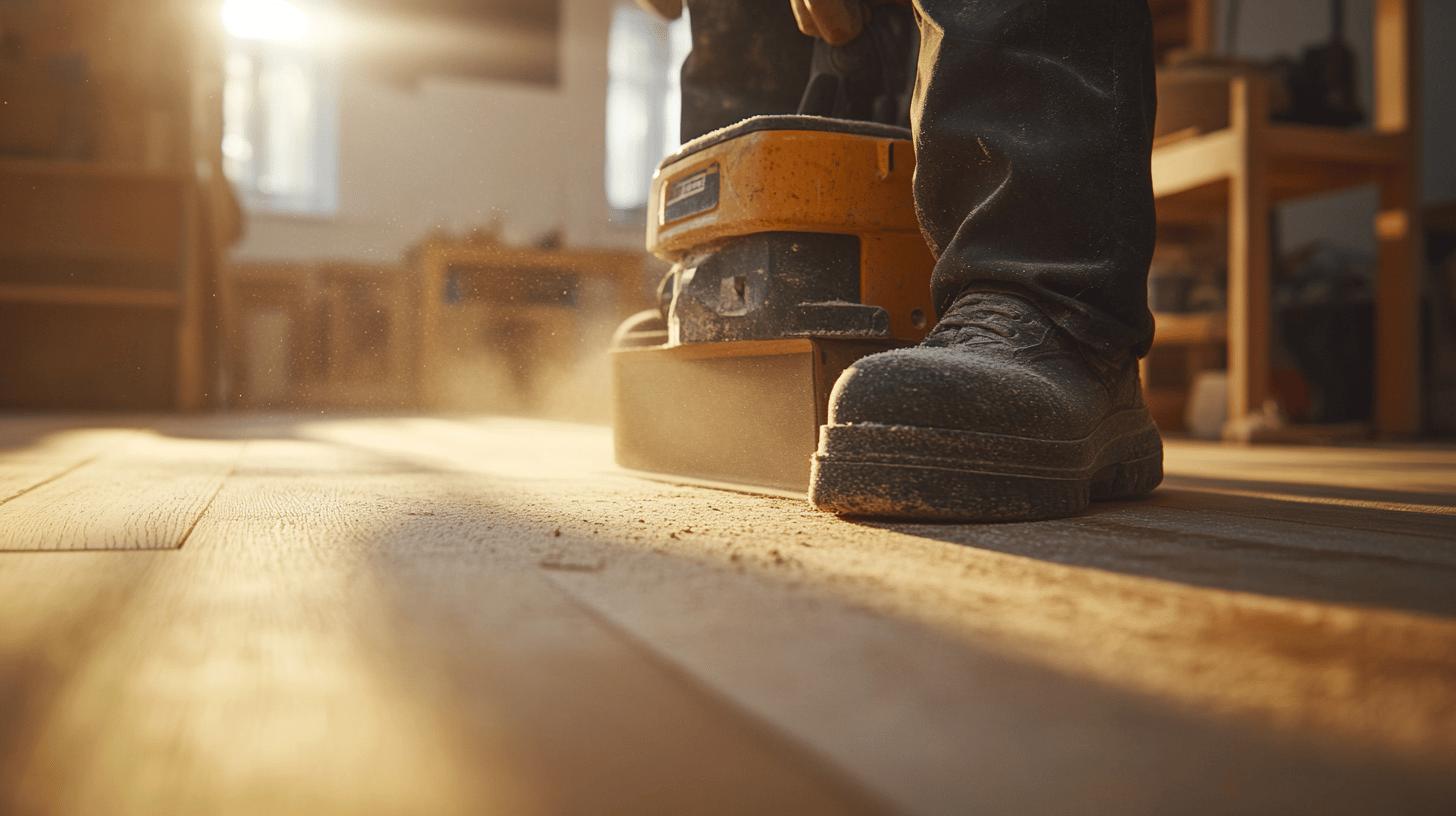
Thorough preparation through professional floor sanding is critical for successful wood floor staining. Properly preparing the wood surface ensures that the stain adheres evenly and enhances the wood’s natural beauty. Neglecting this step can result in uneven colouring, blemishes, and a less durable finish. By dedicating time and effort to preparation, you set the foundation for a flawless stain application, leading to a more aesthetically pleasing and long-lasting result.
- Remove all furniture.
- Cover vents with plastic sheeting.
- Use painter’s tape to secure the plastic.
- Sand the floor with various grit sandpaper.
- Vacuum and wipe the floor clean.
Once the preparation steps are complete, focus on the cleaning process. Sanding wood floors is essential to remove any old finish and to create a smooth surface for the stain. Begin with coarse-grit sandpaper, around 40 or 60 grit, and gradually move to finer grits, up to 120 or 150 grit, ensuring an even surface. Following sanding, it is crucial to clean the floor meticulously. Use a vacuum to remove all dust and debris, then follow up with a damp cloth to wipe the floor clean. This step ensures that no particles remain that could interfere with the stain, allowing for a smooth and even application.
Choosing the Right Wood Stain
Selecting the right wood stain is crucial because it significantly impacts the look and feel of your space for years to come. A well-chosen stain can highlight the natural beauty of the wood, complementing your home’s aesthetic and adding to its overall value. Conversely, a poorly chosen colour might clash with your decor or fail to achieve the desired effect, leading to costly redo efforts. Therefore, investing time into this decision is essential for a satisfying and enduring finish.
Testing stains is a vital step to ensure the colour aligns with your expectations. Begin by applying the stain to a concealed area of the floor or a piece of scrap wood to see how it interacts with the specific type of wood. Different woods absorb stains differently, affecting the final hue and intensity. Additionally, consider the room’s lighting, as it can alter the appearance of the stain. Taking these factors into account helps avoid unpleasant surprises and ensures a harmonious blend with the room’s design.
There are several stain options available, each offering unique characteristics. Oil-based stains are popular for their rich finish and durability, while water-based variants provide quicker drying times and are more environmentally friendly. Gel stains offer consistency in application, especially for vertical surfaces. Consider the specific needs of your floor and personal preferences when choosing the best wood stain for your project.
Applying the Stain to Your Wood Floor
Before applying wood stain, ensure the surface is thoroughly prepared. Start by shaking the stain can vigorously to achieve even pigment distribution. Pour the stain into a paint kettle carefully to prevent splashing. Choose the right tool for application based on the floor area and desired technique. For optimal results, work in small, manageable sections. This approach prevents the stain from drying unevenly and avoids lap marks, which can occur if the stain overlaps on dry areas. Employ virtually dust-free sanding equipment to maintain a clean workspace, free from particles that could mar the finish.
To ensure even coverage, maintain a consistent application method. Use a brush for detailed areas, applying long, smooth strokes to blend the stain seamlessly. A roller is ideal for covering large sections quickly, allowing you to keep a wet edge to prevent lines. When using a cloth, rub the stain in a circular motion, starting in a discreet spot to gauge the wood’s absorption. Avoid common pitfalls such as overloading the brush, which can lead to drips and uneven colouring. By adhering to these techniques and tips, you can achieve a professional-grade finish on your wood floors.
Allowing the Stain to Dry and Cure
Drying time for wood stain is a critical phase in achieving a flawless finish. Allowing the stain to dry completely is essential to prevent smudging, uneven colouring, and damage to the surface. Typically, a drying period of 24 hours is recommended, during which the floor should remain untouched. This period ensures the stain sets properly, enhancing the wood’s appearance and ensuring long-lasting results.
- Do not walk on the floor while drying.
- Ensure adequate ventilation.
- Allow full curing time before moving furniture.
After the stain has dried, the curing process begins, which is crucial for the floor’s durability and longevity. Curing requires an additional 2–3 days, during which the finish hardens and bonds with the wood. Avoid any foot traffic and keep furniture off the floor during this time to ensure the surface remains unblemished. Adequate ventilation is vital during drying and curing, as it facilitates the evaporation of any residual solvents, resulting in a stronger finish. Once fully cured, the floor will be ready for furniture reintroduction, creating a beautifully stained and resilient wood floor.
Protecting and Maintaining Your Stained Wood Floor
Applying a protective wood floor sealing finish is crucial to safeguarding your stained wood floor, enhancing its durability and aesthetic longevity. A polyurethane finish is highly recommended due to its exceptional protective qualities. This finish forms a robust barrier against wear and tear, preserving the stain’s vibrancy. The application process involves using a brush or roller to apply an even coat, taking care to maintain a wet edge to prevent lap marks. After the stain has thoroughly dried, typically within 24 hours, apply the polyurethane finish in thin, even layers. Allow each layer to dry completely before applying the next, with most projects requiring two to three coats for optimal protection. This method not only enhances the floor’s appearance but also extends its lifespan.
- Use furniture pads to prevent scratches.
- Clean gently with appropriate wood floor cleaners.
- Reapply and finish periodically.
- Avoid excessive water on the floor.
Long-term maintenance of stained wood floors involves consistent care routines to retain their beauty and function. Regular cleaning with suitable wood floor cleaners helps remove dirt and debris without damaging the finish. It’s important to avoid excessive water when cleaning, as it can seep into the wood and cause swelling or damage. Incorporate furniture pads under heavy items to prevent scratches and indentations. Periodically reapply the protective finish, typically every few years, to maintain the floor’s resilience against daily wear. By following these maintenance strategies, you ensure the stained wood floor remains a stunning and enduring feature of your space.
Final Words
Mastering the art of wood floor staining involves meticulous preparation, careful selection of stain, and precise application. Each step, from sanding and cleaning to choosing the ideal stain, plays a crucial role in achieving a refined finish.
The entire process, including allowing adequate drying and curing times, ensures durability and aesthetic appeal. Consistent protection and maintenance, such as applying a protective finish and gentle cleaning, preserve the floor’s elegance.
With this Step-by-Step Guide to Perfectly Staining Your Wood Floor, create a beautiful, enduring floor that enhances home aesthetics.
FAQ
How to stain wood floors darker?
Staining wood floors darker requires thorough sanding, choosing a dark stain, and evenly applying it with a brush or roller for optimal coverage.
How do you stain hardwood floors without sanding?
While it is possible to stain without sanding, results are often better with sanding, as it ensures an even finish by removing old layers and imperfections.
What are some common wood floor stain colours?
Wood floor stain colours range from light, such as Natural or Golden Oak, to dark shades, like Walnut or Ebony, depending on your aesthetic preference.
What is a wood floor stain and sealer in one?
A stain and sealer in one provides convenience by colouring and protecting wood in a single application, saving time and effort during floor renovation.
Can you apply stain to hardwood floors with a roller?
Applying stain with a roller is suitable for large areas; it helps maintain a wet edge, avoiding lap marks and ensuring uniform application.
How do you clean a wood floor before staining it?
Preparation involves removing all furniture, sanding the floor, and thoroughly cleaning it to eliminate dust and debris that can affect stain adhesion.
Do I have to sand my hardwood floors before staining?
Sanding hardwood floors before staining is recommended for a smoother application, enhancing stain absorption and revealing the wood’s natural beauty.
What are the steps to staining wood floors?
The steps include removing furniture, sanding the floor, selecting a stain, applying it evenly, and allowing it to dry fully before sealing.
What is the best stain for hardwood floors?
The best stain choice depends on personal preferences, wood type, and desired finish, with options available from leading brands like Minwax or Varathane.


