
Is floor sanding a walk in the park for DIY enthusiasts or a potential hazard zone? While the prospect of breathing life back into an ageing wooden floor can be gratifying, safety is paramount. With flying debris, intense noise, and dust clouds, the DIY floor sanding experience is not without risks. Equipping oneself with the proper safety gear is essential for preventing injuries and health issues along this rewarding journey. From protective goggles to gloves and slip-resistant footwear, ensuring a safe and successful home project begins with understanding and applying these floor sanding safety essentials.
Essential Protective Gear for Floor Sanding
Protective gear is crucial in safeguarding against the potential hazards of floor sanding. The process generates significant dust and noise, which can lead to respiratory issues and hearing damage if appropriate measures are not taken. Wearing the right protective gear prevents immediate injuries and mitigates long-term health risks. Ensuring you have the correct equipment before beginning a DIY floor sanding project is essential to maintain safety and efficiency throughout the task.
- Safety goggles
- Dust masks
- Ear protection
- Gloves
- Slip-resistant footwear
- Protective clothing
Safety goggles protect your eyes from dust particles and debris that may become airborne during sanding. Dust masks are vital for preventing the inhalation of fine dust, which can lead to respiratory complications. Ear protection shields your hearing from the loud noises produced by sanding equipment. Gloves protect your hands from blisters and cuts, while slip-resistant footwear reduces the risk of slipping on dusty or uneven surfaces. Finally, protective clothing acts as a barrier against dust and debris, ensuring you remain comfortable and safe throughout the sanding process.
Equipment Handling and Safety Practices
Understanding the operation of sanding equipment is essential for maintaining safety and achieving the best results in floor sanding. Before starting your project, thoroughly familiarize yourself with your sander’s different parts and functions. Reading the manufacturer’s manual is a critical step that should not be overlooked. Proper training and practice in handling the sander can prevent accidents and ensure a smoother sanding process. Knowing how to operate the equipment correctly will also enhance your confidence and efficiency, reducing the likelihood of errors and equipment damage.
Regular maintenance is crucial to prevent equipment failure and ensure optimal performance of your sanding tools. Regularly inspect your equipment for any signs of wear or damage. Cleaning your sander after use, especially its dust collection components, can prevent blockages and maintain efficiency. Ensure that all moving parts are lubricated as per the manufacturer’s guidelines to reduce friction and wear. Replacing worn-out sandpaper belts or pads promptly is vital to maintaining the effectiveness of your sanding. Regular maintenance not only prolongs the life of your equipment but also enhances safety by preventing unexpected malfunctions during operation.
| Equipment Type | Maintenance Tips |
|---|---|
| Drum Sander | Check drum alignment, clean dust collection regularly, and replace worn belts. |
| Belt Sander | Inspect belt tension, ensure rollers are clean, and change belts as needed. |
| Orbital Sander | Examine pad condition, clean air vents, and replace sanding discs promptly. |
Choosing the appropriate sanding equipment depends on floor conditions and your level of DIY expertise. Drum sanders, for example, are suitable for heavily damaged or uneven floors but require a higher skill level due to their aggressive sanding nature. Belt sanders are ideal for large, flat areas and offer more control for novice users. Orbital sanders are preferred for finishing work, providing a finer touch on delicate surfaces. Assess the condition of your flooring and your proficiency with power tools to select the most suitable equipment, ensuring both safety and success in your DIY sanding project.
Effective Dust Control Methods
Dust control is a critical aspect of floor sanding, essential for both health and safety. Sanding generates a significant amount of fine dust that can become airborne, posing respiratory hazards and affecting air quality in the workspace. This airborne particulate can lead to respiratory issues, skin irritation, and other health concerns without proper dust management. Additionally, excessive dust can settle on surfaces throughout the home, leading to a prolonged cleanup process. Implementing effective dust control measures protects the health of those involved in sanding and ensures a cleaner, safer environment.
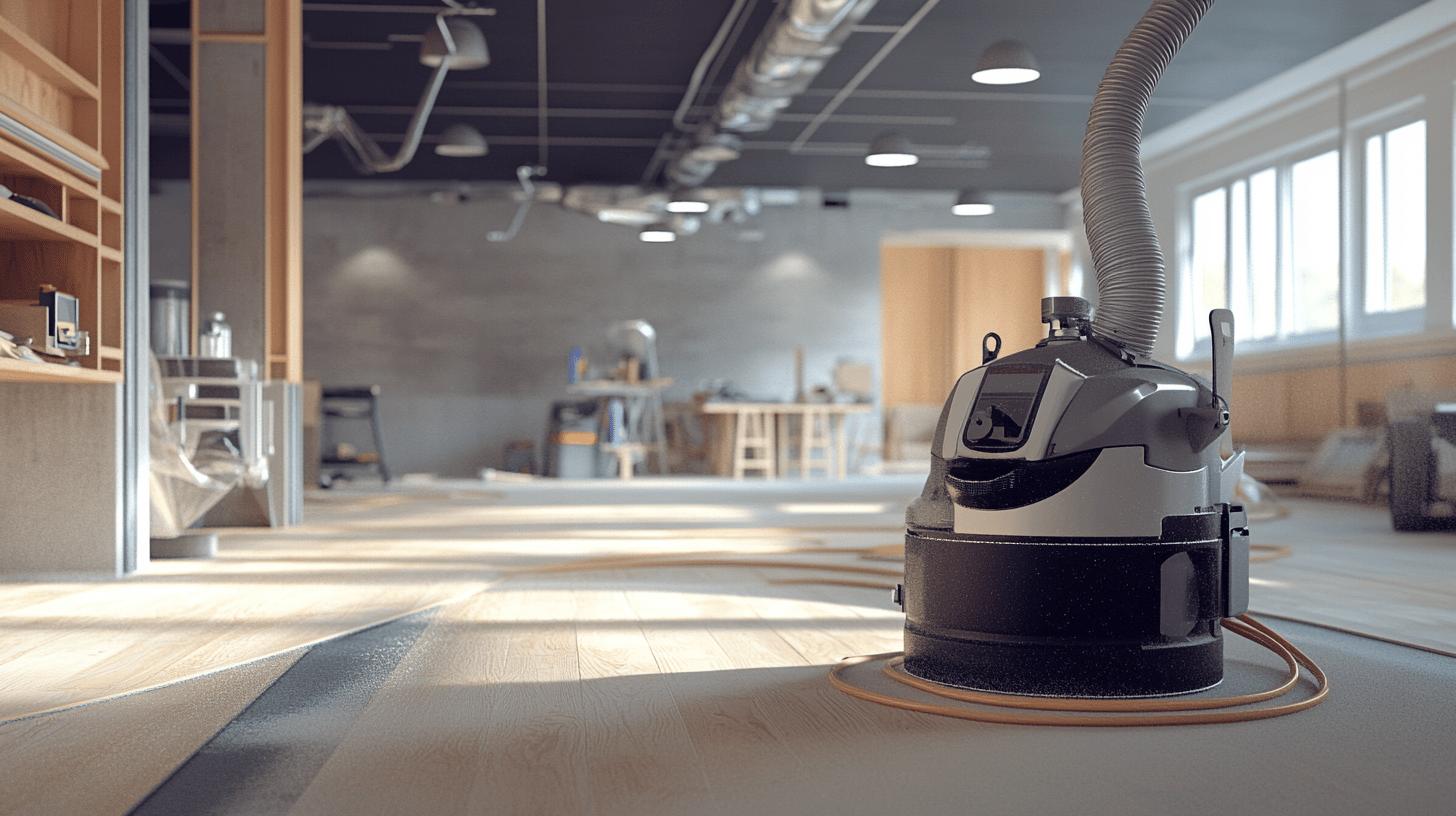
Dust Extraction Systems
What are the benefits of using dust extractors during sanding? Dust extractors are invaluable for capturing dust at the source, significantly reducing airborne particles. When integrated with sanding equipment, a reliable dust extractor system can efficiently collect dust through suction, minimizing its release into the air. Look for extractors with high-efficiency particulate air (HEPA) filters, which are designed to trap even the smallest dust particles, enhancing air quality. Dust collection bags, used with extractors, provide an additional layer of dust management, ensuring that collected dust is securely contained and easily disposed of, further reducing exposure.
Several best practices can help minimize the spread of dust when preparing the workspace. First, cover furniture and immovable items with plastic sheeting to shield them from settling dust. Second, seal off vents and doorways with temporary barriers to prevent dust from spreading to other areas of the home. Utilizing vacuum attachments on sanding equipment can aid in direct dust collection, complementing other dust control measures. These steps are crucial in maintaining a tidy and manageable work environment, reducing the hassle of extensive cleaning post-sanding.
Maintaining good air quality during sanding is as crucial as controlling dust spread. Wearing masks designed to filter fine dust particles protects against inhalation, safeguarding respiratory health. Ensure that masks fit securely and provide adequate filtration for the project’s duration. Regularly ventilating the workspace by opening windows or using fans can also help disperse dust particles, further maintaining a breathable environment. Combining these practices ensures a comprehensive approach to dust management, promoting safety and health throughout the sanding process.
Preparing Your Workspace for Safe Sanding
A well-prepared workspace is crucial to ensure safety and efficiency during floor sanding. Proper organisation and setup can significantly reduce the risk of accidents and complications, making the process smoother and more manageable. One of the primary concerns is the prevention of dust and debris from spreading, which can be achieved by covering immovable items with plastic sheeting. Adequate lighting and ventilation are also essential to maintain visibility and air quality, which helps in executing the task with precision and comfort. Additionally, delineating and securing the sanding zone from children and pets is vital to prevent accidents and interruptions.
- Clear the area: Remove all furniture and objects from the workspace to avoid obstacles and protect your belongings from dust.
- Cover items: Use plastic sheeting to cover any immovable items, ensuring they remain dust-free and undamaged.
- Improve lighting: Ensure adequate lighting to enhance visibility, allowing you to spot uneven spots and manage sanding precision.
- Ensure ventilation: Open windows or use fans to maintain air circulation, ensuring a breathable environment and effective dust dispersal.
- Secure the zone: Demarcate the workspace and keep it secure from children and pets to prevent accidents and ensure an uninterrupted workflow.
Keeping the area clear from unauthorized access is fundamental to maintaining a safe and focused working environment. Children and pets are particularly prone to entering workspaces out of curiosity, which can lead to potential hazards. By securing the area and implementing these workspace preparation steps, you ensure a safer, more efficient sanding process.
Common Mistakes and How to Avoid Them
Common mistakes in DIY floor sanding can lead to unsatisfactory results and potential damage to your flooring. Sanding too aggressively, for instance, can cause gouges or uneven surfaces, detracting from the floor’s appearance and requiring additional repairs. Uneven sanding can result in a patchy finish, where some areas may appear smoother or shinier than others. Further, neglecting to follow proper grit progression can hinder the sanding process, leaving rough patches that are difficult to smooth out. Not considering the type of wood flooring can lead to improper technique application, which might damage the floor. Inadequate planning, such as failing to account for humidity levels, can affect the finish’s drying and curing time, potentially leading to a flawed result.
- Sanding too aggressively
- Uneven sanding
- Improper grit progression
- Ignoring floor type
- Inadequate planning
To avoid these common mistakes, following best practices and planning is essential. Starting with a coarse grit sandpaper and gradually moving to finer grits ensures an even and smooth finish. This progression helps remove scratches from the previous grit, preparing the surface for finishing.
Understanding the specific requirements of the wood type you are working with is also crucial. Different materials like hardwood, engineered wood, or parquet flooring require unique approaches to sanding. Planning your project during dry seasons will help achieve optimal results, as humidity can impact the drying time and finish quality. Adequate preparation and adherence to recommended techniques will enhance your sanding efficiency and the overall outcome of your DIY project.
Regularly reviewing safety tips and best practices is crucial for improving your DIY sanding skills and ensuring safe, successful outcomes. By staying informed about potential pitfalls and how to avoid them, you can approach each project confidently and competently, reducing the risk of accidents and achieving professional-quality finishes.
Final Words
The importance of essential floor sanding safety tips for DIY enthusiasts cannot be overstated when mastering DIY floor sanding. Each aspect plays a crucial role in preventing injuries, from selecting the right protective gear to ensuring proper handling and maintenance of sanding equipment.
Techniques for effective dust control maintain air quality and protect health while preparing the workspace to ensure a safe and efficient project environment. Avoiding common mistakes enhances the quality of results and prolongs floor life. With diligence and attention to detail, achieving beautiful wood floors safely is entirely achievable.
FAQ
What protective gear is essential for floor sanding?
Always wear safety goggles, dust masks, and ear protection to safeguard against dust and noise during floor sanding. Additionally, use gloves and slip-resistant footwear to prevent injury and ensure safety.
How does proper equipment handling contribute to safe floor sanding?
Understanding the operation of floor sanding equipment and conducting regular maintenance prevents equipment failure and enhances performance. Familiarise yourself with each tool’s function and ensure it is in top condition before use.
What are effective dust control methods during floor sanding?
Using a dust extractor with a reliable collection system is crucial for effective dust management. Cover vents and use vacuum attachments to minimise airborne dust, thus maintaining air quality and safety during sanding.
How do you prepare a workspace for safe sanding?
Clearing the workspace, enhancing lighting, ensuring proper ventilation, and securing the area from children and pets are critical steps in creating a safe sanding environment. Demarcate the zone to prevent unauthorised access.
What are common DIY floor sanding mistakes, and how can they be avoided?
Common mistakes include sanding too aggressively, uneven sanding, improper grit progression, ignoring floor type, and inadequate planning. Avoid these by following best practices such as starting with coarse grit, considering wood material, and planning during dry seasons.


